
How to Configure OkkProxy in DICloak Browser
Watch Full Video Tutorial
DICloak is an anti-detect browser designed to create and manage isolated browser profiles with customized fingerprints and network environments. By connecting a reliable proxy to each browser profile, you can route web traffic through a selected IP address and location.
OkkProxy provides proxy solutions that can be used with DICloak, including residential and other proxy types that support HTTP(S) and SOCKS5 connections.
This guide explains how to connect an OkkProxy proxy to DICloak, verify the connection, and assign the proxy to a browser profile.
What You Need Before Starting
Before configuring OkkProxy in DICloak, make sure you have:
- A DICloak account with the DICloak application installed
- An active OkkProxy account
- An available OkkProxy proxy
- The proxy host, port, username, and password
- A proxy type supported by both OkkProxy and DICloak
For the best results, prepare the proxy information in advance so you can complete the configuration without switching between multiple pages.
Step 1: Get Your OkkProxy Proxy Details
First, log in to your OkkProxy account and open the Use Proxies section.
Depending on the proxy product you are using, you may need the following information:
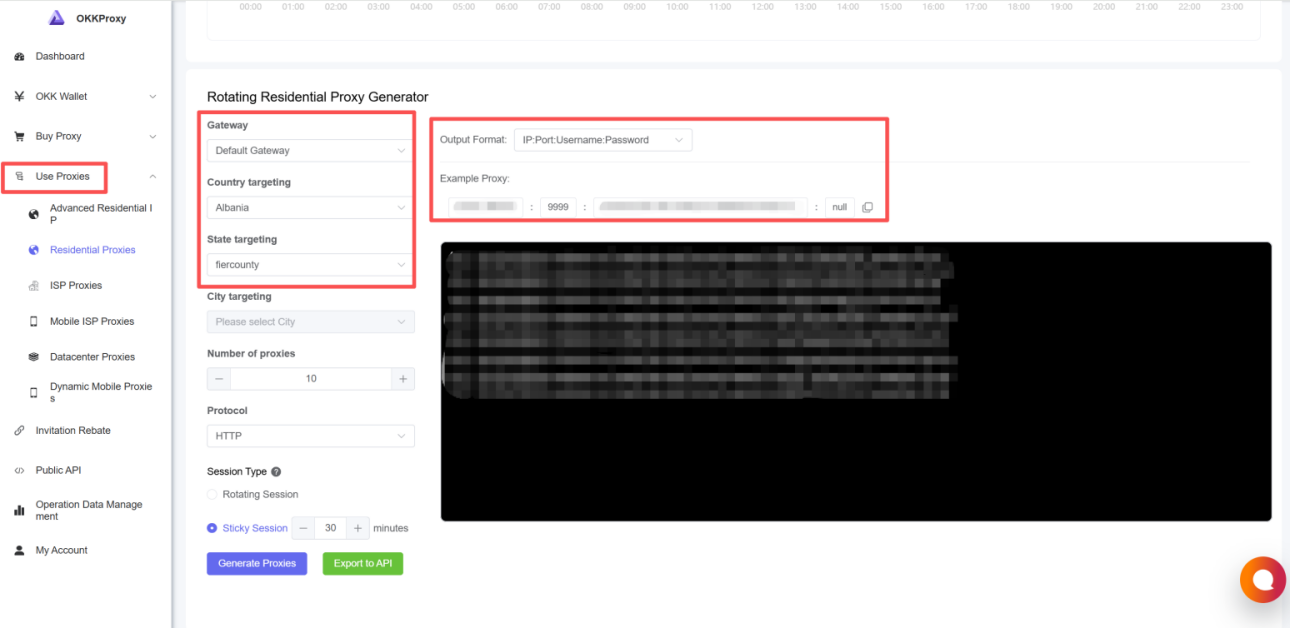
| Parameter | Example |
|---|---|
| Proxy Type | HTTP / SOCKS5 |
| Proxy Host | proxy.example.com |
| Proxy Port | 8080 |
| Username | your_username |
| Password | your_password |
Copy the proxy credentials from your OkkProxy dashboard.
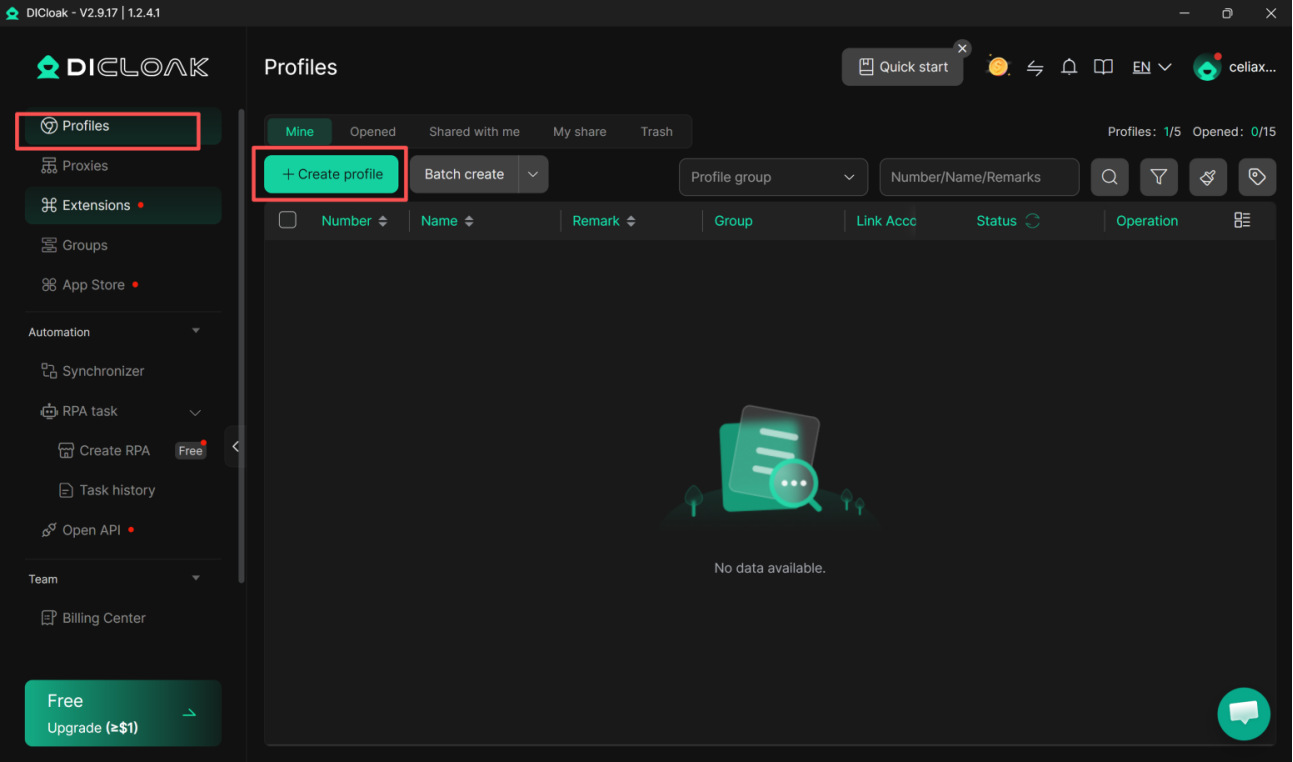
Step 2: Open DICloak and Create a Browser Profile
Launch DICloak and sign in to your account.
From the left navigation menu, open Profiles and click Create Profile.
You will be taken to the browser profile configuration page, where you can define the profile's general settings, fingerprint parameters, and proxy connection.
DICloak allows a proxy to be configured while creating a new browser profile, so the profile can use the selected proxy connection when it is launched.
Step 3: Select Custom Proxy
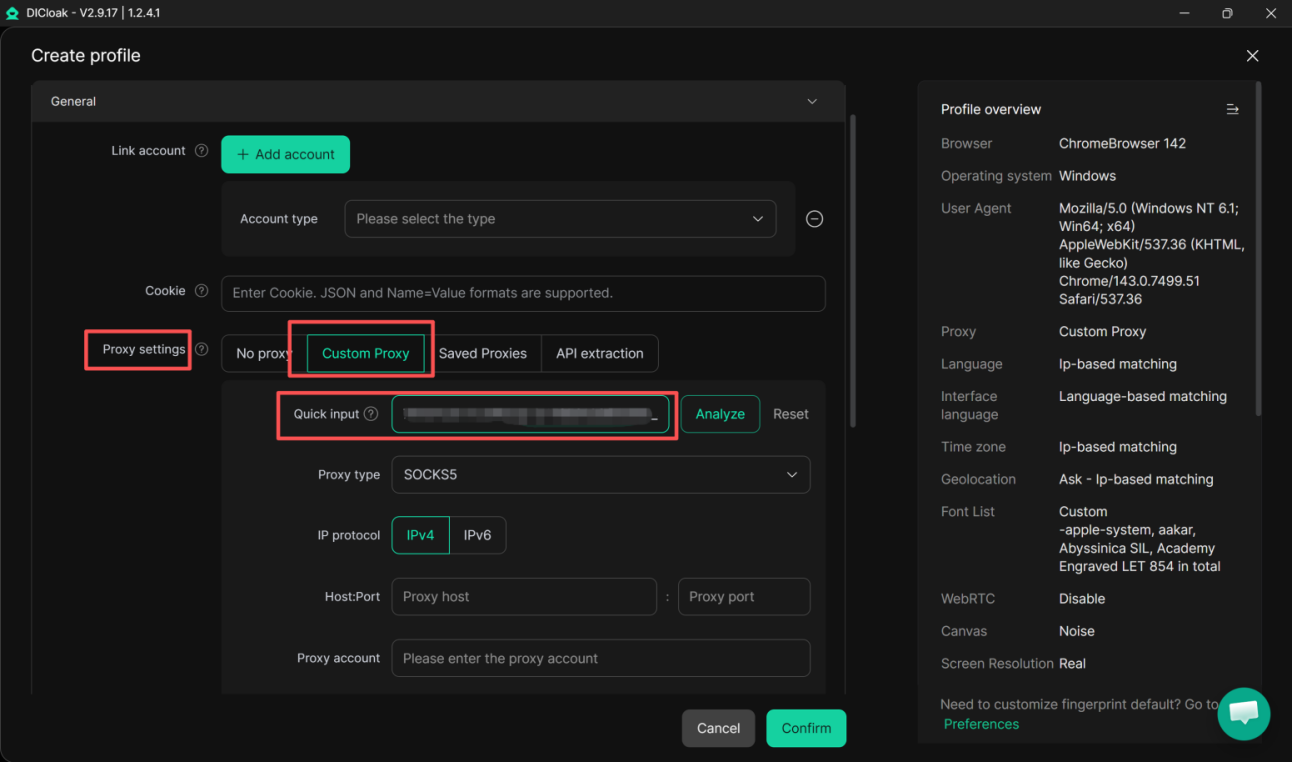
Scroll to the Proxy Settings section.
DICloak provides several proxy options, including:
- No Proxy
- Custom Proxy
- Saved Proxies
- API Extraction
For a new OkkProxy connection, select Custom Proxy.
This option allows you to manually enter the proxy connection details provided by OkkProxy. DICloak's current interface also supports quick input, which can parse proxy information into the corresponding fields.
Step 4: Enter Your OkkProxy Information
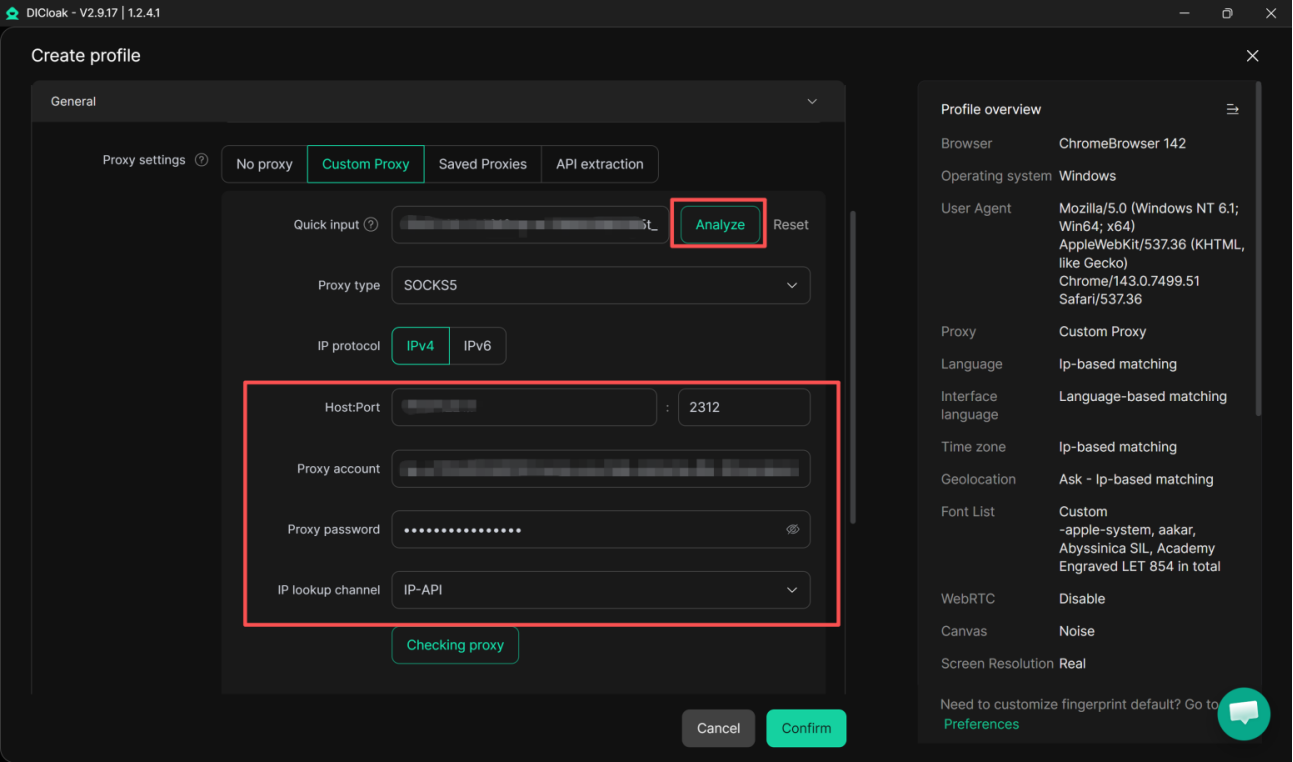
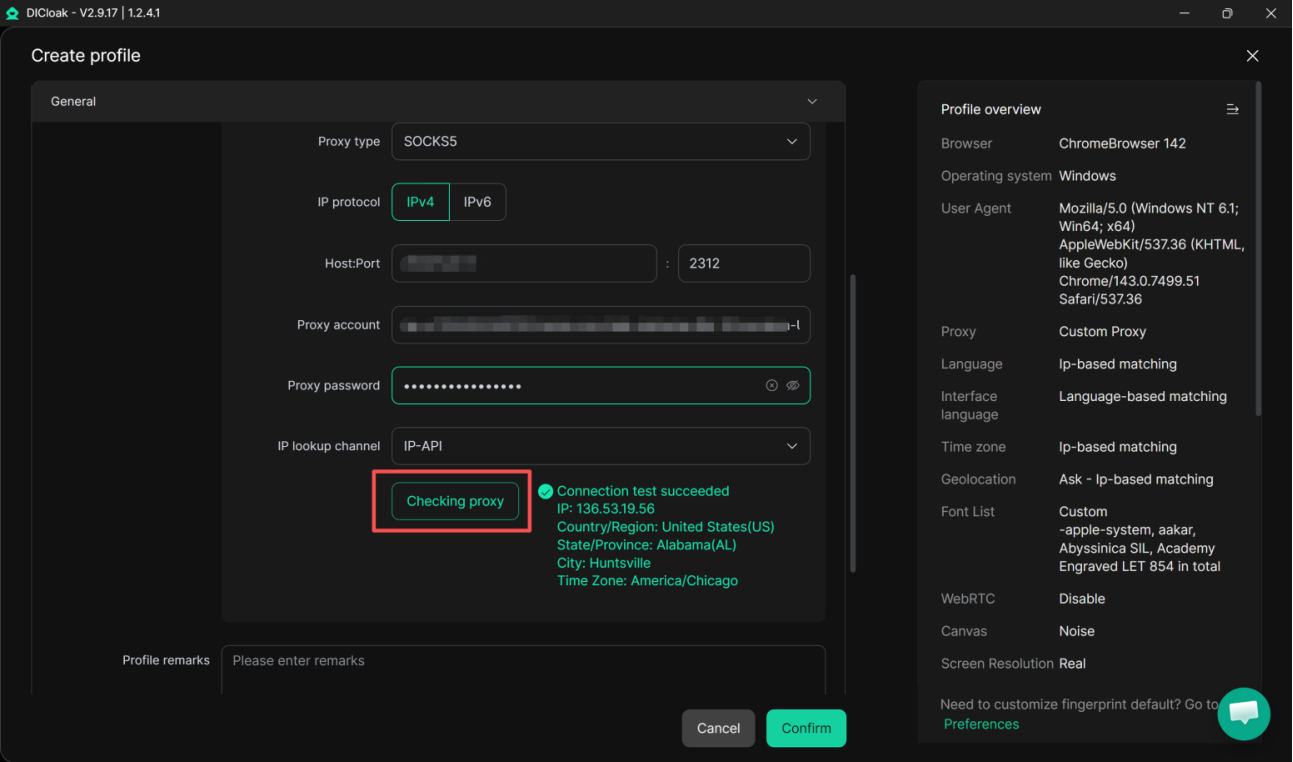
Enter the proxy information into the Quick input field and click Analyze. DICloak will attempt to identify the proxy parameters and populate the corresponding fields automatically.
Step 5: Check the Proxy Connection
After entering the proxy information, click Checking proxy.
DICloak will test the connection and display information associated with the proxy, such as:
- Connection status
- Exit IP address
- Country or region
- Time zone
Compare the displayed IP and location with the proxy you selected in OkkProxy.
Step 6: Save the Proxy and Browser Profile
Once the proxy test succeeds, save the proxy configuration.
You can then complete the remaining browser profile settings and click Confirm or Create Profile.
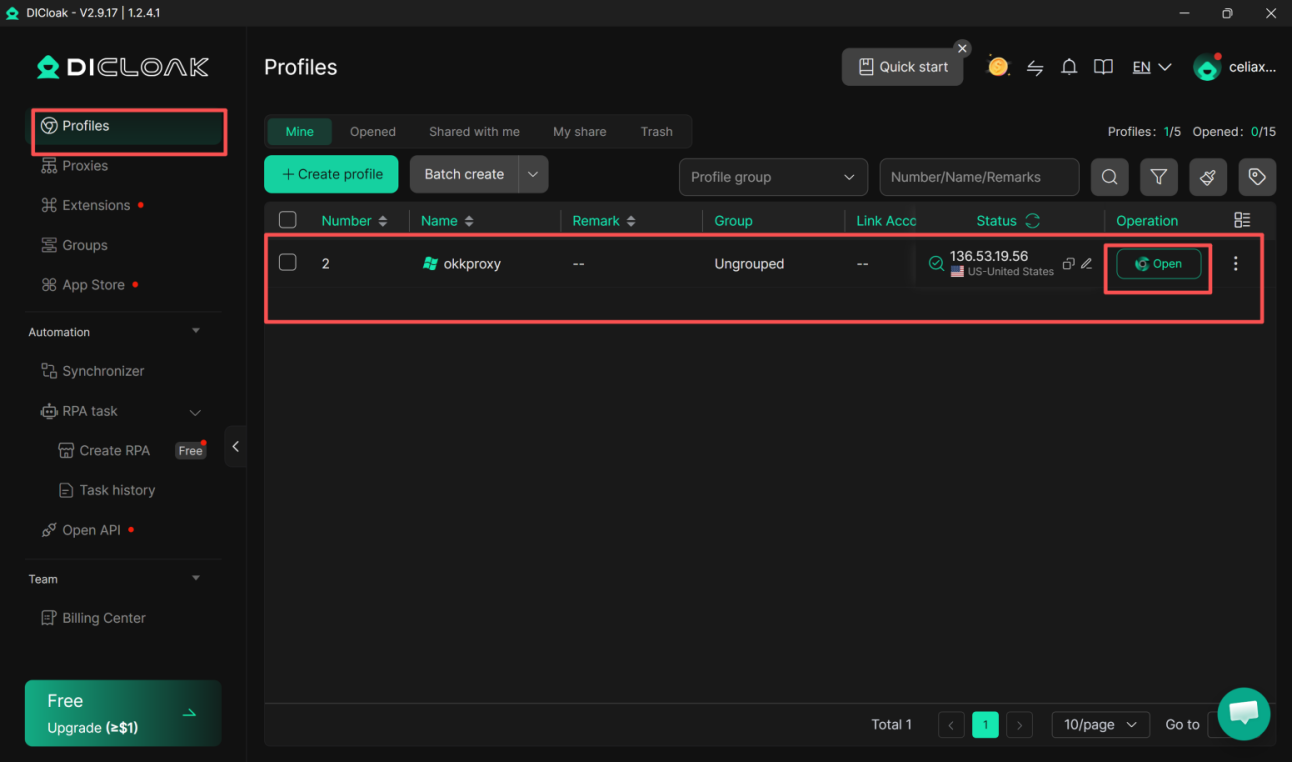
The browser profile will now be associated with the OkkProxy connection.
When you launch the profile, its web traffic will be routed through the configured proxy rather than using your computer's direct public IP.
Using a Saved OkkProxy Proxy
If you regularly use the same OkkProxy proxy connections, saving them in DICloak can make profile management easier.
Instead of entering the proxy information every time you create a profile:
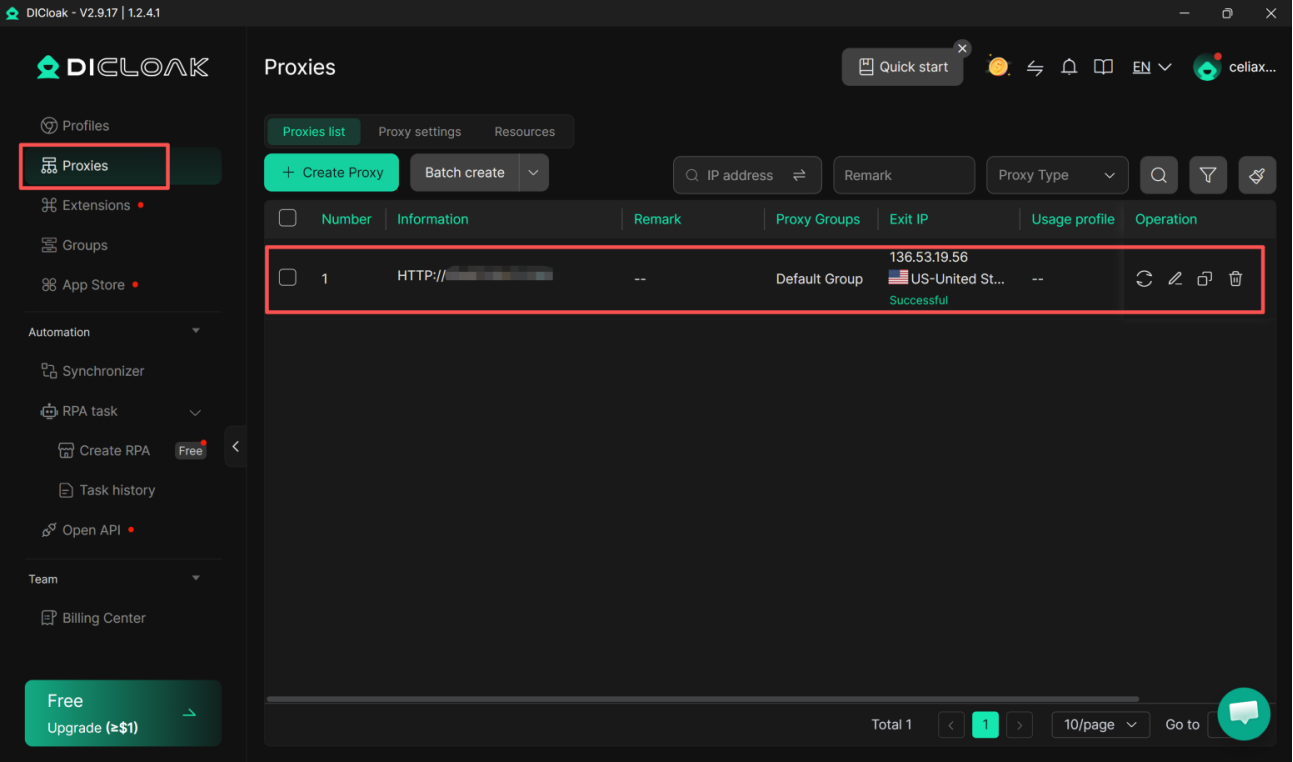
- Open Proxies in DICloak.
- Click Create Proxy.
- Add the OkkProxy connection.
- Click Checking proxy to verify it.
- Save the proxy after the connection succeeds.
- When creating a browser profile, select Saved Proxies.
- Choose the OkkProxy proxy you want to assign.
DICloak's Saved Proxies feature allows previously configured proxies to be selected when creating profiles. It also provides a random selection option for users managing multiple saved proxies.
Managing Multiple OkkProxy Proxies
For users managing multiple browser profiles, assigning a separate proxy to each profile can make network management easier.
For example:
| Browser Profile | Proxy | Target Region |
|---|---|---|
| Profile 01 | OkkProxy Proxy 01 | United States |
| Profile 02 | OkkProxy Proxy 02 | United Kingdom |
| Profile 03 | OkkProxy Proxy 03 | Germany |
| Profile 04 | OkkProxy Proxy 04 | Canada |
You can first create the required OkkProxy connections under Proxies, verify them individually, and then assign them to the corresponding DICloak profiles.
DICloak also supports proxy groups and proxy assignment features for users managing larger numbers of proxy configurations.
Keep Profile and Proxy Settings Consistent
When using location-specific proxies, it is useful to keep the browser profile settings consistent with the selected proxy location.
For example, if a profile uses a US proxy, consider using the appropriate language, time zone, and other browser settings for the intended environment.
This does not replace the proxy itself, but it can help maintain a more consistent profile configuration.